webpack4系列教程,如何编写plugin处理html代码逻辑?
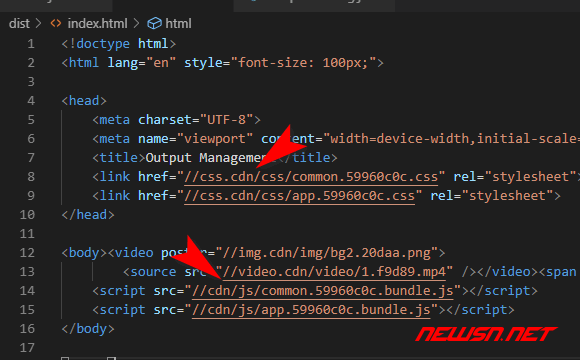
发布于 作者:苏南大叔 来源:平行空间笔记本~在上一篇文章中,利用不同位置的publicPath,对html中的cdn地址,进行了处理。但是,遗留了一个小问题,就是css和js的cdn地址,并没有分开。

本文测试环境:win10、node@14.2.0、npm@6.14.4、webpack@4.43.0。
不大不小的误会
为了区分css和js的publicPath,苏南大叔想了一些办法,但是都失败了。
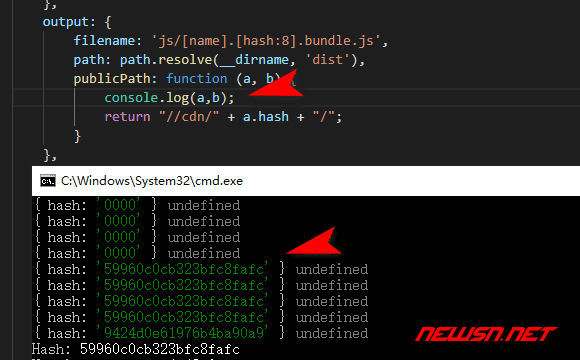
output的publicPath,设置为函数。
结果就只能收到一个对象,里面包含了一个没啥用的hash。
output: {
    filename: 'js/[name].[hash:8].bundle.js',
    path: path.resolve(__dirname, 'dist'),
    publicPath: function (a, b) {
        console.log(a,b);
        return "//cdn/" + a.hash + "/";
    }
},
MiniCssExtractPlugin.loader的publicPath,设置为函数。
参数确实多了,不过,这个loader里面的publicPath,不是拿来设置css文件本身的地址的。而是用于处理css文件内部,引用的资源(例如图片和字体)的地址的。
{
  test: /\.css$/,
  use: [
    {
      loader: MiniCssExtractPlugin.loader,
      options: {
        publicPath: (resourcePath, context) => {
          return path.relative(path.dirname(resourcePath), context) + '/';
        },
      },
    },
    'css-loader',
  ],
},- 试图修改
MiniCssExtractPlugin.loader
找到了一个函数,叫做mainTemplate.getAssetPath()。不会修改。
- 试图修改
HtmlWebpackPlugin
没分析出它的内部逻辑,不过在官网看到了一个hook它的html结果的例子。下面的代码是github上面的原版例子:
// If your plugin is direct dependent to the html webpack plugin:
const HtmlWebpackPlugin = require('html-webpack-plugin');
// If your plugin is using html-webpack-plugin as an optional dependency
// you can use https://github.com/tallesl/node-safe-require instead:
const HtmlWebpackPlugin = require('safe-require')('html-webpack-plugin');

class MyPlugin {
  apply (compiler) {
    compiler.hooks.compilation.tap('MyPlugin', (compilation) => {
      console.log('The compiler is starting a new compilation...')

      // Static Plugin interface |compilation |HOOK NAME | register listener
      HtmlWebpackPlugin.getHooks(compilation).beforeEmit.tapAsync(
        'MyPlugin', // <-- Set a meaningful name here for stacktraces
        (data, cb) => {
          // Manipulate the content
          data.html += 'The Magic Footer'
          // Tell webpack to move on
          cb(null, data)
        }
      )
    })
  }
}

module.exports = MyPlugin编写一个plugin
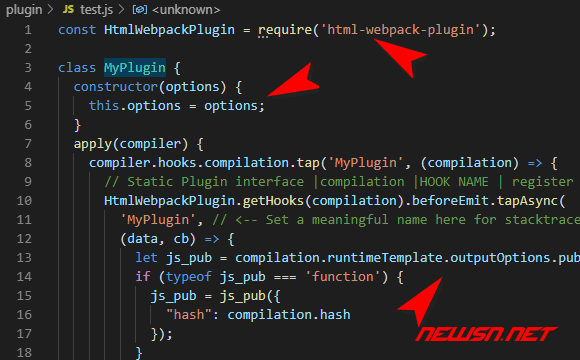
最终,苏南大叔通过编写一个基于HtmlWebpackPlugin的webpack的plugin,成功的分开了css和js的publicPath。虽然代码写的并不是太好。但是毕竟解决了问题。下面是一些代码要点:
- 获得配置中的
output
compilation.runtimeTemplate.outputOptions- 获得插件本身的
options
constructor(options) {
    // console.log('插件被使用了')
    this.options = options;
}- 获得
html
data.html
代码如下:
把上边这个代码保存到plugin/test.js文件。然后调用方式就是:webpack.config.js:
let MyPlugin = require(path.resolve(__dirname, 'plugin/test.js'));
module.exports = {
    //...
    output: {
        //...
        publicPath: "//cdn/",
    },
    plugins: [
        new MyPlugin({ publicPath: '//css.cdn/' }),
        //...
    ],
}
相关链接
- https://seosn.com/say/webpack-start.html
- https://seosn.com/say/webpack-css.html
- https://seosn.com/say/webpack-font.html
- https://seosn.com/say/webpack-public-path.html
总结
虽然在本文中,苏南大叔是利用了一个replace解决了区分css和js的cdn地址的需求。但是,这个插件也为苏南大叔打开了一扇门,对html模版,如果有什么不满意,就可以在这个地方进行修改了。很方便不是?
下面的地址,是苏南大叔写的webpack系列经验文章,欢迎点击:

思路一样,看看怎么实现的
真不错