css代码中的优先级是如何排序的? important强制提升优先级
发布于 作者:苏南大叔 来源:平行空间笔记本~前端的程序员们都知道,可以使用!important来提升css的优先级。那么,其实大家都知道,css在使用!important之前,也是有不同的优先级层次的。那么使用了!important来强制提升优先级之后,会发生什么事情呢?

大家好,这里是苏南大叔的平行空间笔记本博客。这里记录苏南大叔和计算机代码的故事。本文讨论css的优先级排序问题,问题非常基础,高手请飘过。测试环境:chrome@104.0.5112.102。
css基础的优先级排序
css可以使用#id选择器定义,也可以使用.类选择器定义。可以定义在style标签里面,还可以定义在css文件里面。还可以定义在html元素的style属性里面。那么,这些css的优先级是怎么定义的呢?
首先,"style标签里面" 对比 "link的css文件" 的话,谁定义在后面谁生效。或者说,两者的地位是相同的,谁在后面谁就会生效。
<style>
</style>
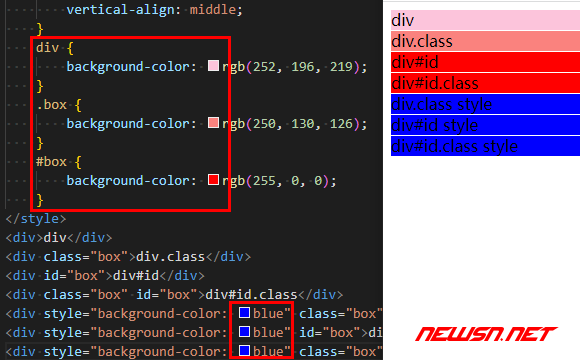
<link rel="stylesheet" href="css.css">其次,定义的作用范围越具体,优先级越高。这个其实也比较好理解。比如:div、div.class、div#id、<div style=''> 这几种形式。谁定义的范围更具体呢?谁的优先级就比较高。下面的代码是范例:
<style>
    div {
        font-size:16px;
        width: 300px;
        height: 20px;
        line-height: 20px;
        margin-bottom:1px;
        clear: both;
        text-align: left;
        vertical-align: middle;
    }
    div {
        background-color: rgb(252, 196, 219);
    }
    .box {
        background-color: rgb(250, 130, 126);
    }
    #box {
        background-color: rgb(255, 0, 0);
    }
</style>
<div>div</div>
<div class="box">div.class</div>
<div id="box">div#id</div>
<div class="box" id="box">div#id.class</div>
<div style="background-color: blue" class="box">div.class style</div>
<div style="background-color: blue" id="box">div#id style</div>
<div style="background-color: blue" class="box" id="box">div#id.class style</div>这个例子里面,div、div.box、div#box的颜色依次加深,作用在具体元素上面的时候,背景色又换成了blue。

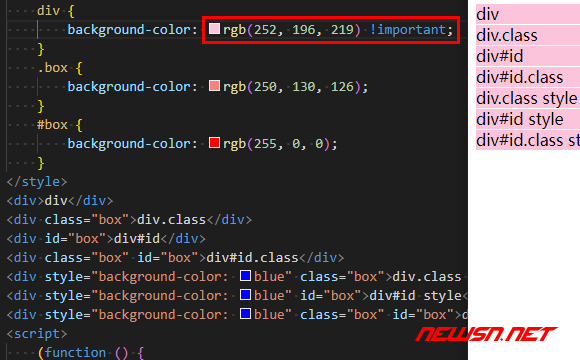
如果使用important提升优先级的话,在上个例子中,可以使用!important来提升优先级,谁设置了!important谁的优先级就是第一。但是,大家都设置了!important的话,就还是遵循原来的优先级排序。就这好比1234排序,!important权重100。单独加个100就最大数了,但是如果大家都加100,那么结果还是101,102,103这样的排序方案。

一个人使用大招就是大招,大家都用大招就是效果抵消了...
使用js调整!important
平时都是使用js调整css属性,但是碰到!important的时候,就有些小麻烦了,下面的是几种js原生调整的方式。(关于这个需求,jq其实是最好用的。)
<script>
    (function () {
        for (var i = 0; i < document.all.length; i++) {
            var e = document.all[i];
            var color = window.getComputedStyle(e, null).backgroundColor;
            if(e.tagName.toLowerCase()=="div"){
                // e.style.backgroundColor = 'pink';
                // e.setAttribute("style","background-color:pink !important");  //注意写法,不推荐
                // e.style.setProperty("background-color", "pink");
                e.style.setProperty("background-color", "pink","important");
            }
        }
    })()
</script>- 常规的
e.style.backgroundColor,并不能修改!important。 e.setAttribute("style","background-color:pink !important");可以修改!important,但是会破坏原有的css。e.style.setProperty(),这个不破坏css,但是也不能设置!imporant。- 最终完美方案
e.style.setProperty("background-color", "pink","important")。完美方案就是使用e.style.setProperty(),加个第三个参数"important",注意没有感叹号。
对于要修改的属性,也可以先删除,再添加。
e.style.removeProperty("background-color");
e.style.setProperty("background-color","pink");值得说明的是:属性之间也有包容关系。比如上边这个background-color,删除background,也是可以的,效果一样。
e.style.removeProperty("background");相关链接
- https://seosn.com/say/css-first-line.html
- https://seosn.com/say/css-marker.html
- https://seosn.com/say/css-selector.html
总结
一句话总结就是:!important很令人头疼。更多css文章,请点击苏南大叔的博客:
